
Painting bedroom furniture is one of the most accessible and rewarding DIY projects, it costs far less than replacing pieces and transforms outdated or worn items into statement pieces. Whether refinishing a thrifted dresser, updating a nightstand, or giving a bed frame new life, the results can dramatically refresh a bedroom’s look. The key isn’t expensive equipment or artistic talent: it’s following the right sequence: prep, prime, paint, and protect. This guide walks through the entire process, from clearing workspace to applying a durable finish that’ll hold up to daily use.
Key Takeaways
- Painting bedroom furniture requires a disciplined sequence of prep, prime, paint, and protect—following these steps is more important than expensive tools or artistic skill.
- Proper surface preparation including cleaning, sanding with 120-grit sandpaper, and priming with thin, even coats ensures paint adheres durably and delivers professional-looking results.
- Apply paint in thin, overlapping coats rather than thick applications; two coats with 2–4 hours drying time between them prevents runs, drips, and brush marks.
- Seal your finished paint with a polyurethane or polycrylic topcoat to protect bedroom furniture from daily wear, dust, and spills—the difference between a finish that lasts five years versus six months.
- Avoid common mistakes like skipping primer, painting in cold or humid conditions, and rushing dry times; patience and attention to environmental conditions are key to a durable, refreshed look.
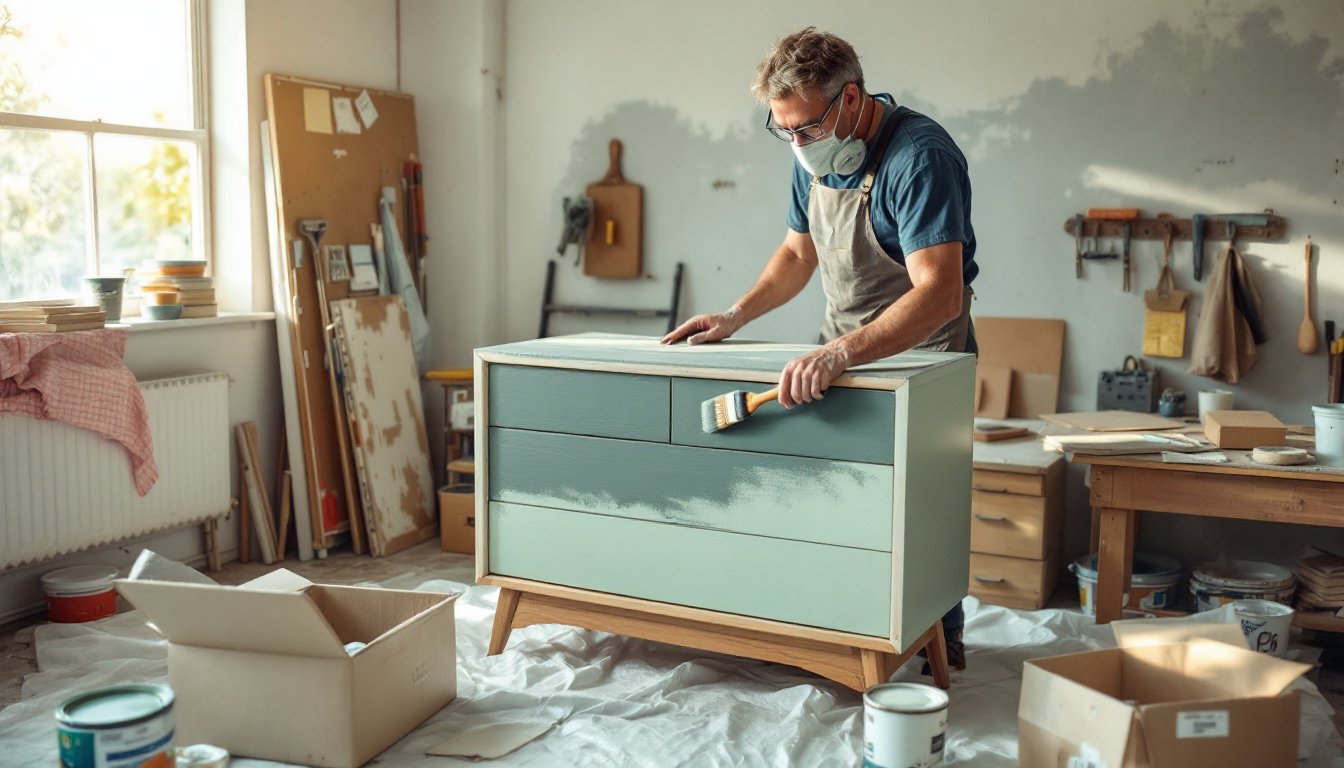
Prepare Your Furniture and Workspace
Start by clearing a well-ventilated area, a garage, driveway, or basement work best. Lay down drop cloths or plastic sheeting to protect flooring and anything you don’t want paint splatter on. Remove all drawers, hardware, shelves, and knobs from the piece. Place hardware in a labeled bag so it’s easy to reinstall later.
Inspect the furniture for damage: loose joints, veneer bubbles, or deep dents. Minor issues aren’t deal-breakers (paint hides them), but wobbly joints should be glued and clamped before starting. If you’re working with laminate or veneer over particleboard, be aware that paint adhesion can be trickier than solid wood, you’ll need to prep extra carefully.
Let the furniture acclimate to your workspace temperature for at least a few hours. Cold or humid conditions slow drying time and can cause finish problems. Aim for 50–85°F and relative humidity below 85%.
Gather Your Tools and Materials
You don’t need an extensive toolkit. Here’s what matters:
Essential Tools:
- Orbital sander with 120-grit and 150-grit pads (or sanding sponges and blocks for detail work)
- Paintbrushes: quality 2-inch angled brush for large surfaces and a 1-inch straight brush for trim and edges
- Paint roller and tray for wide, flat surfaces (optional but speeds up coverage)
- Tack cloth to remove dust before painting
- Painter’s tape
- Drop cloths or plastic sheeting
- Stir stick, paint tray, and bucket of clean water or mineral spirits
- Safety gear: safety glasses, disposable gloves, dust mask (N95 or P100 for solvent fumes)
Materials:
- Primer: Use bonding primer for glossy or laminate surfaces: acrylic primer for raw wood. One quart covers roughly 400 sq. ft.
- Paint: Choose furniture-grade latex or oil-based paint. Latex dries faster and has lower VOC: oil offers durability but requires solvent cleanup. Satin or semi-gloss finish resists dust better than flat in a bedroom.
- Polyurethane or polycrylic topcoat: Protects paint from scratches and moisture (water-based polycrylic for latex, oil-based for oil paint).
Don’t cheap out on brushes, cheap bristles shed and leave streaks. A quality brush costs $10–20 and makes the difference between amateur and pro-looking results.
Clean, Sand, and Prime Your Furniture
Cleanliness is non-negotiable. Dust, grease, and old finish prevent new paint from sticking. Wipe the entire piece with a damp rag and mild soap, paying special attention to crevices and corners. Let it dry completely, damp wood won’t sand well.
Next, sand the furniture. This step roughens the surface so primer and paint bond properly. Use 120-grit sandpaper for initial passes, working with the grain on wood. Sand until the existing finish is dulled: you don’t need to strip bare wood (that’s overkill for most pieces). Edges and molding can be sanded by hand using a sanding sponge. Wipe away all dust with a tack cloth before moving to primer.
Apply primer in thin, even coats, this is where many DIYers fail. One thick coat of primer looks smoother but often runs and takes forever to dry. Two thin coats is the standard: let the first dry per manufacturer instructions (usually 1–4 hours), sand lightly with 150-grit, then apply the second. For laminate or glossy surfaces, use a bonding primer: for raw wood, acrylic primer works fine. Primer seals stains and creates a uniform surface for topcoat paint.
Apply Paint Like a Professional
Before opening the paint can, stir thoroughly, at least 2–3 minutes, or have the store shake it. Pour paint into a roller tray or paint bucket: don’t paint straight from the can.
Apply paint in thin, overlapping strokes using long, even motions. Load your brush moderately, too much paint causes drips: too little causes dry spots. Work in manageable sections, maintaining a wet edge to avoid lap marks. For large flat surfaces, a roller is faster and leaves a smoother finish than brush strokes, though small furniture often looks better brushed.
Two coats is standard: the first coat may look transparent or blotchy, that’s normal. Let the first coat dry per the label (usually 2–4 hours for latex), sand lightly with 220-grit sandpaper to smooth brush marks, wipe with a tack cloth, then apply the second coat. Resist the urge to paint over tacky paint: patience prevents runs and drips.
For trim, edges, and detailed areas where a roller won’t fit, use the angled brush with careful, deliberate strokes. Paint these spots after rolling the main areas so you’re not chasing a wet edge across intricate corners.
Seal and Protect Your Painted Furniture
Paint alone won’t survive bedroom use, drawers sliding in and out, dust settling, and the occasional spill will damage an unprotected finish. Topcoat protection extends the life of your work significantly.
Polyurethane (oil-based) or polycrylic (water-based) both work. Polycrylic is easier for DIYers: it dries in 3–6 hours, cleans up with water, and emits fewer fumes. Polyurethane is tougher but requires mineral spirits for cleanup and has a stronger smell: use it only if your workspace is well-ventilated.
Apply topcoat with a quality brush, using the same thin-coat method as paint. One coat is sometimes enough, but two coats provide better protection, especially for drawer fronts and surfaces that see heavy wear. Sand between coats with 220-grit paper. Let the final coat cure fully before moving or using the furniture: polyurethane needs 24–48 hours, polycrylic about 24 hours.
Avoid Common Painting Mistakes
Skipping primer: Paint sticks better over primer. Painting raw wood without it leads to blotchy color and poor durability.
Painting in cold or humid conditions: Below 50°F or above 85°F, paint dries too slowly or unevenly. High humidity traps moisture in the film, causing adhesion problems. Wait for better weather when possible.
Over-applying paint: Thick coats look smooth at first but run, sag, and dry slowly. Thin coats dry faster and level out naturally. Three thin coats beat two thick ones.
Reusing old hardware on fresh paint: Clean and inspect knobs and hinges before reinstalling. Tarnished or rusty hardware cheapens the look. If they’re worn, upgrade to new handles, a budget-friendly refresh that pairs beautifully with new paint.
Rushing dry time: Painting over wet or tacky surfaces causes brush marks, streaking, and poor adhesion. Follow drying times on the label: when in doubt, wait longer.
Skipping the topcoat: Paint is vulnerable. A protective clear coat is what separates a DIY project that lasts five years from one that chips in six months.
Conclusion
Painting bedroom furniture is a manageable project with outstanding results. The sequence, prep, clean, sand, prime, paint, topcoat, matters more than equipment or budget. Start with a small piece if you’re new to this, and don’t skip steps even though it’s tempting. Once you’ve finished one dresser or nightstand, you’ll have the skills and confidence to tackle bigger pieces. A freshly painted furniture set redefines a bedroom and costs a fraction of replacement.