
Paper wall decor offers homeowners an affordable, low-commitment way to refresh any room without paint, wallpaper, or major renovations. Whether someone’s renting and can’t paint, working on a tight budget, or simply exploring seasonal updates, paper-based projects deliver genuine visual impact with minimal tools and materials. The beauty of paper decor lies in its versatility: from handmade paper flowers to collage installations, these projects work in bedrooms, living rooms, home offices, and kid spaces. Most require only scissors, glue, and a few hours, no drywall patching or primer needed. This guide covers five paper decor projects that are practical to execute, look finished rather than homemade, and adapt easily to any aesthetic.
Key Takeaways
- DIY wall decor with paper is an affordable, renter-friendly alternative to paint or wallpaper that costs under $25 per 100-square-foot wall and requires only basic tools like scissors and glue.
- Paper flower installations with heavyweight cardstock can cover large feature walls in 4–6 hours by layering petals in clustered groups for a polished, organic look.
- Paper collage walls work in home offices and bedrooms by combining 3–5 coordinated paper colors in a dry layout before adhering with matte medium for cohesive, forgiving results.
- Paper garlands—whether strand, chain, or tassel styles—add instant visual impact in 1–2 hours and store flat between seasonal uses without permanent wall damage.
- The versatility of paper wall decor allows homeowners and renters to experiment with different aesthetics and quickly pivot to permanent solutions once confident in their design direction.
Why Paper Decor Works for Budget-Friendly Updates
Paper decor strikes a balance between affordability and impact that few other materials can match. A single roll of heavy cardstock costs $5–$12, yet yields dozens of usable pieces for a feature wall. Compared to wallpaper (which demands primer, smoothing, and professional results to avoid bubbles), paper projects stay flat and forgiving. If someone dislikes the result, removal is instant, no steamer, scraper, or drywall repair needed.
Another advantage: paper decor doesn’t require permits, structural assessment, or professional evaluation. A homeowner can tackle a floor-to-ceiling paper flower wall in a rental apartment without landlord approval, provided they use removable adhesive. This matters. Renters account for roughly one-third of all home improvement spending, according to recent industry surveys, and most can’t afford permanent changes.
Paper also accepts color and texture in ways that allow layering. Watercolor paper, kraft stock, tissue, and specialty finishes all work together in a single project, creating depth without bulk. That layering is the secret to paper decor looking intentional rather than DIY-basic.
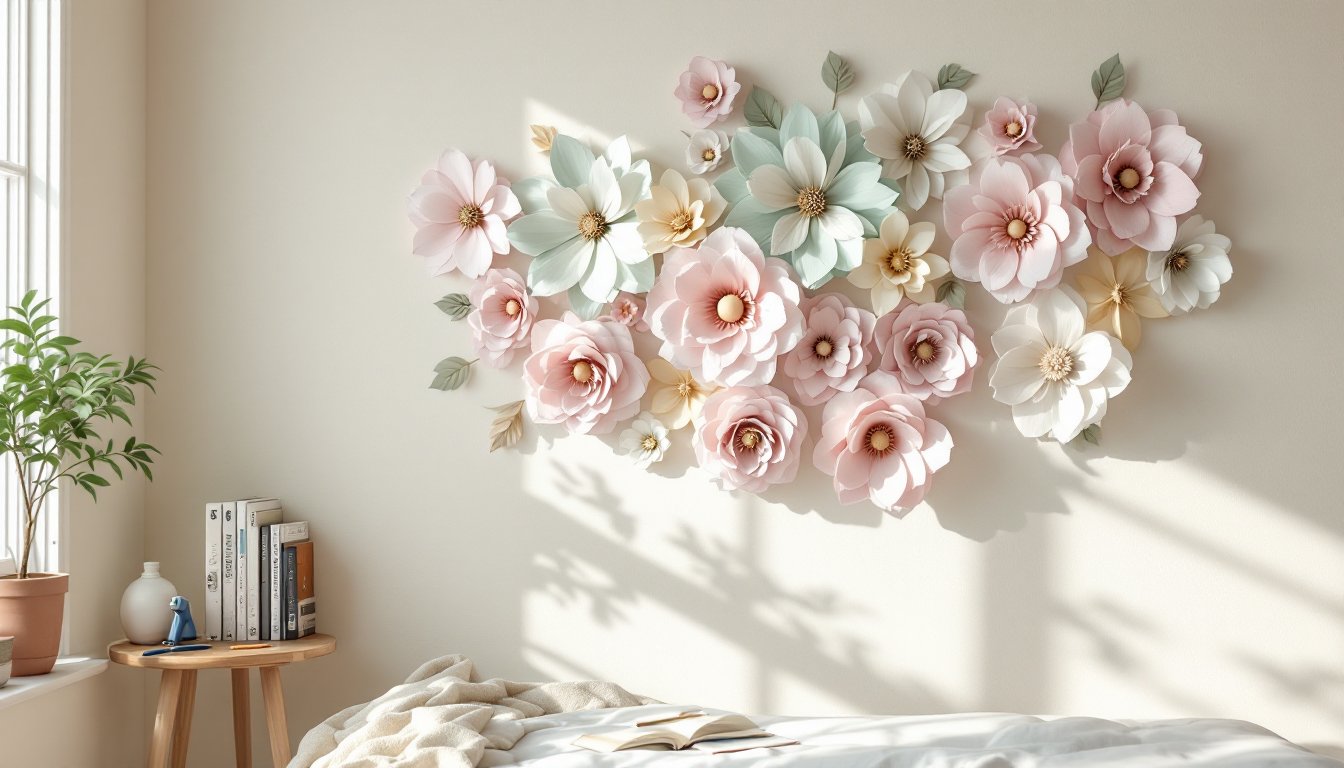
Paper Flower Wall Installations
Paper flowers are the workhorse of paper decor projects. They cover large areas quickly, work in any color scheme, and suit formal or casual rooms equally well. A single feature wall, say, a 6-foot by 8-foot bedroom wall, typically needs 20–40 blooms depending on density.
Creating Dimensional Blooms From Cardstock
Start with heavyweight cardstock in your chosen colors (65–110 lb. cardstock holds shape better than lighter stock). A single sheet yields one bloom: a pack of 50 sheets from a craft supplier costs $4–$8.
Materials needed:
- Heavyweight cardstock (multiple colors)
- Sharp scissors or craft knife
- Hot glue gun and glue sticks
- Optional: paint brush, watercolors, or markers for hand-tinting
- Removable Command strips or low-tack adhesive dots
- Ruler or straight edge
Steps:
-
Cut petal templates. Draw or print petal shapes (simple rounded teardrops work, roughly 2 to 4 inches long). Cut five to eight petals of varying sizes per flower. Slightly overlapping sizes create realism.
-
Curl petals. Drag petal edges lightly over a pencil or your scissor blade to curl them outward. Don’t over-curl: the goal is gentle, not spiral.
-
Layer and glue. Start with the largest petal, glue it to your wall using a removable adhesive, then layer smaller petals on top, angling them slightly. Stagger the starting angle of each petal rather than stacking them symmetrically, asymmetry reads as more organic.
-
Add a center. Use a small circle of contrasting cardstock, rolled tissue, a wooden bead, or even a button. Glue it into the petal nest to finish the bloom.
-
Cluster intelligently. Group 3–5 blooms in tight arrangements, then leave breathing room between clusters. Flowers floating alone at random intervals look scattered: clustered arrangements feel curated.
Variants: Paint petals with watercolor before layering, use kraft or colored tissue for a softer look, or add layers of transparent vellum over solid stock for depth. A single wall typically takes 4–6 hours for a homeowner working alone.
Paper Collage and Mixed-Media Walls
Collage walls work beautifully in home offices, bedrooms, or accent walls in living spaces. The appeal: they’re faster than flower installations and forgive imperfection. Torn edges and irregular placement are the style.
Materials needed:
- Assorted paper (magazines, kraft, scrapbook stock, newspaper, book pages, old maps, sheet music)
- Scissors or craft knife
- Matte medium, glue stick, or spray adhesive
- Paintbrush (for applying matte medium)
- Acrylic matte varnish (optional, for sealing)
- Wall primer or light base coat (optional, if wall texture is very uneven)
Approach:
-
Prep the wall lightly. A clean, dry wall is enough. If the wall has heavy texture, a thin coat of primer helps paper adhere and prevents background color from showing through lighter papers.
-
Collect papers in a color story. Don’t grab random pages: choose 3–5 colors or a monochrome scheme and gather papers within that range. Vintage maps + kraft + cream newsprint reads cohesive: multicolor magazine scraps read chaotic.
-
Cut or tear pieces. Geometric squares (2 to 4 inches) create rhythm: organic tears feel looser. Mix both for visual interest. No single piece needs to be a masterpiece, they’re elements in an ensemble.
-
Dry-layout first. Arrange papers on the wall without adhesive, stepping back to view proportions. Rearrange until the overall composition feels balanced, avoid clustering all dark pieces in one corner.
-
Adhere strategically. Matte medium (thinned slightly with water) works better than glue stick for larger papers, as it doesn’t wrinkle. Spray adhesive is fast but harder to reposition if you change your mind. Brush matte medium onto the wall in sections, then press paper in place.
-
Seal if desired. A coat of matte acrylic varnish protects the collage from dust and minor moisture: skip if the wall is in a dry room.
Timeline: A 4-foot by 6-foot collage takes 2–3 hours from planning to finish. This project suits renters well using low-tack adhesive: papers peel cleanly with gentle removal.
Hanging Paper Garlands and Streamers
Garlands offer instant visual weight without construction. They work seasonally, as permanent installations, or clustered for maximum impact. Paper garland approaches range from simple to elaborate.
Simple strand garland:
- Cut cardstock into 2-inch-wide strips, then cut each strip into shapes (circles, hearts, or geometric forms using a craft punch).
- String shapes onto baker’s twine or lightweight ribbon using a needle or by looping twine through a small hole punched in each shape.
- Drape across the wall in a gentle swoosh or cascade from ceiling toward a furniture corner.
- Secure with painter’s tape or small Command hooks so removal is seamless.
Paper chain garland:
- Cut cardstock into strips roughly 1 inch by 6 inches.
- Form each strip into a loop, glue the ends, then thread the next strip through the loop before gluing. This creates a linked chain.
- Garlands of 20–40 links cover 6–10 feet depending on paper width. A 4-foot section looks sparse: plan for density.
Tassel and streamer hybrid:
- Attach lightweight colored or kraft paper strips (cut 2–4 inches wide and 12–18 inches long) to a ribbon or twine base using double-sided tape.
- Scrunch the paper slightly at the attachment point so it fans out, creating a tassel effect.
- Hang as a standalone garland or drape between two points for a festive-but-refined look.
All garland approaches benefit from even spacing, clusters of three to five pieces spaced 12–18 inches apart read cleaner than scattered individual links. Garlands take 1–2 hours from cutting to installation and work seasonally: store flat in a document box between uses to avoid crushing.
Conclusion
Paper wall decor projects deliver professional-looking results without the cost or permanence of paint, wallpaper, or tile work. Flower installations command visual impact, collages offer flexibility, and garlands adapt to any season or occasion. All three approaches respect renters’ constraints, work with basic tools, and allow for quick pivots if the result doesn’t match expectations. A homeowner can refresh a 100-square-foot wall for under $25, test whether a concept works, and transition to permanent methods only once they’re confident in the direction. That’s the real power of paper: it lets DIYers experiment, iterate, and create without apology.