
Christmas wall decor doesn’t require a designer’s budget or hours scrolling Pinterest. The most impactful holiday displays come from handmade touches, snowflakes cut from printer paper, lights strung by your own hands, advent calendars that build genuine anticipation. Anyone with basic tools and a few dollars in craft supplies can create festive wall displays that feel personal and genuinely impressive. These seven DIY Christmas wall decor projects use materials found at any craft store or recycled from home, cost under $50 total, and need only an afternoon to complete. No special skills required, just a willingness to tape, drill, and hang.
Key Takeaways
- DIY Christmas wall decor projects can be completed in an afternoon with basic tools and materials costing under $50, making festive displays affordable and personal without requiring special skills.
- Paper snowflake garlands are an excellent beginner DIY Christmas wall decor project—cost under $10 and use simple folding and cutting techniques to create unique, lightweight decorations.
- String lights transform blank walls into warm focal points when anchored with adhesive hooks every 12–18 inches; battery-powered options eliminate extension cord hassles.
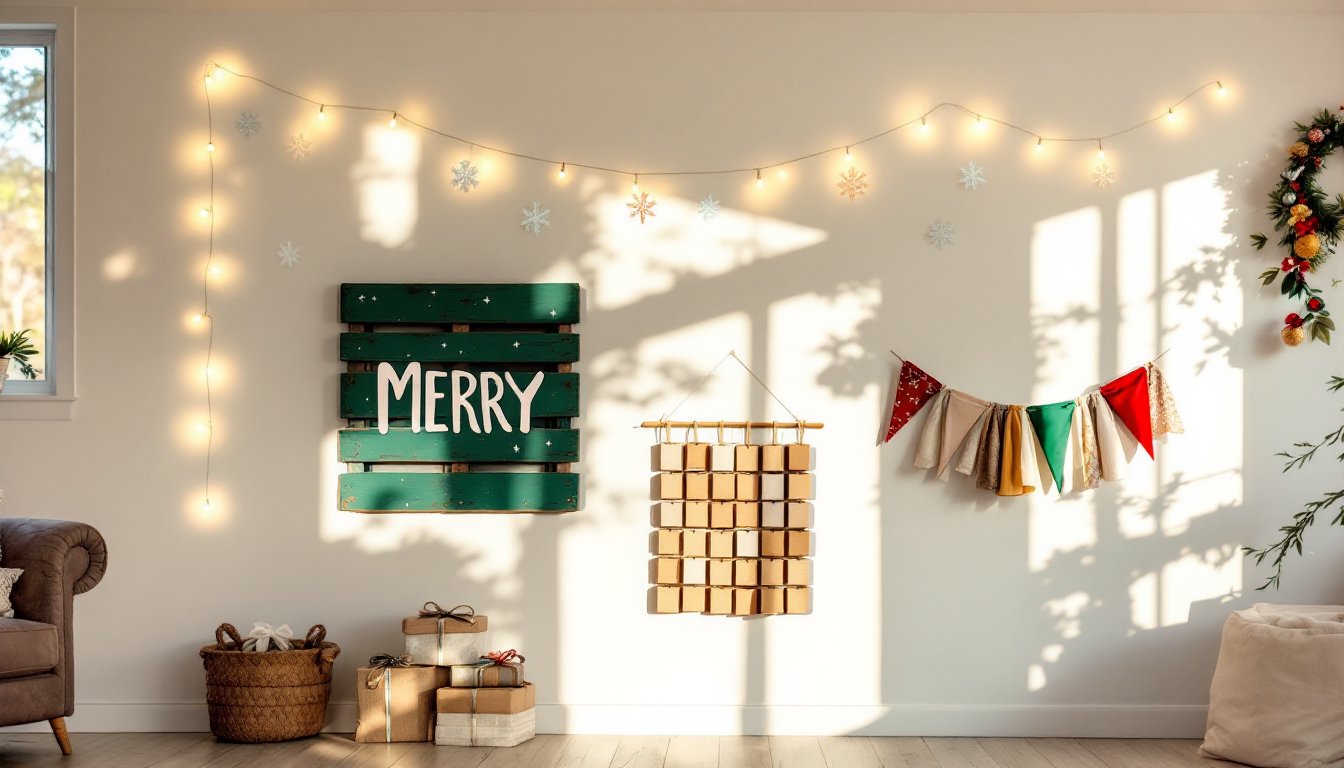
- Personalized advent calendars double as wall decor and family rituals, combining numbered kraft paper boxes with handwritten messages or daily treats for meaningful holiday keepsakes.
- Wooden pallet art requires heavy-duty wall anchors and careful installation due to weight, but delivers a statement-piece aesthetic; pallets are often free from shipping facilities.
- Fabric scrap banners stiffened with craft solution or sewn to backing ribbon offer flexible, budget-friendly alternatives to store-bought holiday decorations.
Paper Snowflake Garland Wall Display
Paper snowflakes are the gateway DIY decoration, cheap, forgiving, and surprisingly effective when hung as a garland across a wall. Start with white or light blue cardstock (heavier than regular printer paper and more forgiving to fold). Fold a square in half diagonally, then in half again, creating a triangle. Continue folding until you have a tight, multi-layered wedge.
Using small scissors or a craft knife, cut geometric patterns from all edges, triangles, curves, crescents, then carefully unfold. Experiment with different cut patterns: each snowflake will be unique. Lay out 10–15 finished snowflakes and punch a small hole near the top of each.
Thread monofilament fishing line or clear thread through the holes, spacing snowflakes 3–4 inches apart. Tape the garland to the wall at anchor points (corners, doorframes) using removable painter’s tape to avoid damage. If tape won’t hold the weight, use small adhesive hooks rated for lightweight decor. Total cost: under $10 for cardstock, tape, and thread.
Rustic String Light Wall Installation
String lights transform a blank wall into a warm focal point. Battery-powered warm-white LED string lights (50-100 count) cost $15–25 and avoid the hassle of extension cords. Check the length, most commercial strings span 20–33 feet, plenty for a single wall accent.
Plan your layout before hanging anything. Drape the lights loosely across the wall to see how they fall, then mark anchor points with a pencil. Install adhesive light hooks rated for the wire gauge (typically labeled on the package) every 12–18 inches along the planned path. Press firmly for 30 seconds per hook: let adhesive cure for 4 hours before hanging lights.
Gently coil excess cord behind furniture or down the side of the wall. If the wall is masonry or concrete, use small plastic anchors and screws instead of adhesive hooks. Test all lights before final installation. Drape garland (floral, eucalyptus, or even simple fabric strips) around the lights for added depth. Cost: $15–30 depending on light count and anchor hardware.
Hanging Paper Advent Calendar
An advent calendar wall display doubles as decoration and daily ritual. Cut 24 kraft paper or cardboard boxes (3×3 inches works well) or use small paper bags stapled closed. Number each 1–24 in bold marker on the front.
Arrange the boxes in a grid or tree shape on the wall using strong removable adhesive strips (rated for the weight of stuffed boxes). Test the adhesive on a hidden spot first: kraft paper is porous and can tear under some adhesives. Leave a 1-inch gap between boxes for visual breathing room.
Fill each box with wrapped candy, small toys, or printed jokes, keep items lightweight to avoid overtaxing the adhesive. Hand-written family messages or holiday activities work equally well. The project costs $8–15 depending on contents.
Create Personalized Holiday Greetings
Turn individual advent boxes into a wishing wall. Rather than treats, prompt family members to write daily reflections, gratitude notes, or holiday memories on slips of paper and place them in each numbered box. On New Year’s, read them together. The calendar becomes a keepsake instead of just a countdown. Decorate the surrounding wall with small drawings, stickers, or printed clipart to frame the calendar and tie it into the larger room design.
DIY Wooden Pallet Christmas Wall Art
A small wooden shipping pallet or reclaimed wood boards (36×24 inches is manageable) becomes a statement piece with minimal tools. Scrub off dirt with a wire brush and soap, then let dry completely. Sand the surface lightly with 120-grit sandpaper to smooth splinters, PPE matters here: wear work gloves and a dust mask.
Decide on a design: a simple “MERRY” stencil, a silhouette Christmas tree, or a snowman face. If comfortable with a saw, cut individual boards into tree-shaped segments and reassemble them on the pallet using exterior-grade wood glue and 1¼-inch wood screws. Drill pilot holes first to avoid splitting.
Paint or stain the assembled piece. Exterior acrylic paint handles holiday moisture better than interior latex and resists fading. Two coats, with 4-hour drying between coats, ensures durability. For a rustic look, skip paint and use bright acrylic markers for hand-lettered text instead.
Install with heavy-duty wall anchors rated for the wood’s weight, pallets are heavier than they look. A 3×2-foot pallet can weigh 30–40 pounds. If the wall can’t support the weight, display the piece leaning against a dresser or shelf instead. Total cost: $15–35 for paint, hardware, and supplies if starting with a reclaimed pallet (many are free from shipping facilities).
Fabric Scrap Holiday Banner
Convert scrap fabric into a festive banner using starch-stiffened fabric triangles hung from a rope or dowel. Gather fabric scraps in holiday colors, red, green, gold, cream. Cut into isosceles triangles approximately 5×7 inches: consistent size isn’t critical but makes the banner look intentional.
Prepare a fabric stiffener solution (sold at craft stores, or mix 1 part fabric stiffener with 4 parts water per package instructions). Soak each triangle for 2–3 minutes, squeeze gently, and shape it to a slight curve or angle. Lay flat on parchment paper to dry for 24 hours. The fabric will hold its shape once dry.
Fold the top edge of each triangle over a ¼-inch rope or wooden dowel and glue with fabric glue. Space triangles 1 inch apart. Attach the rope to the wall using adhesive hooks or small nails at each end. The finished banner spans 3–4 feet depending on triangle count.
Alternatively, skip the starch and sew triangles to a backing ribbon instead of gluing, which is sturdier for long-term storage. Cost: $8–15 for fabric stiffener, glue, rope, and hardware. Fabric scraps are free if you have them: otherwise, thrift stores and fabric remnant bins offer cheap alternatives.
Conclusion
DIY Christmas wall decor succeeds not because it’s complicated, but because it’s personal. Paper snowflakes, string lights, and wooden signs carry the effort you invested into them. Each project costs under $50, takes an afternoon, and requires only basic tools, scissors, a drill, adhesive, a level. The result is a home that feels genuinely festive, not catalog-decorated. Start with the simplest project (snowflakes), build confidence, then tackle something more involved like the pallet art. Your walls will thank you.